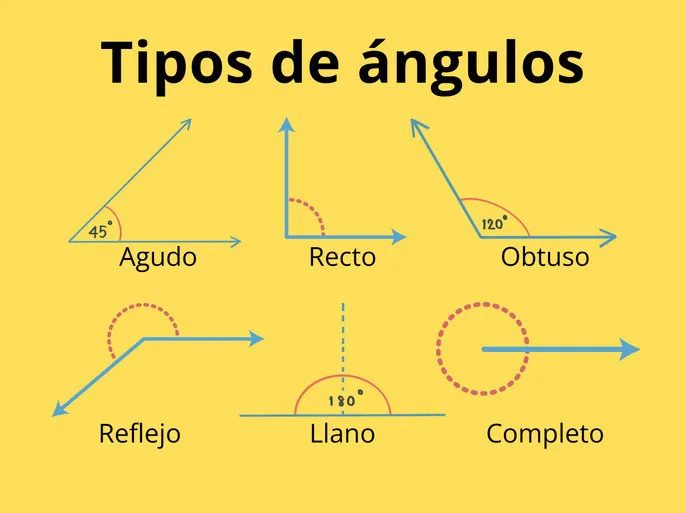
An angle is not just a random shape you see in geometry class. It is a specific part of a plane. This section is defined by two semicircles. These lines are called sides. Both lines start from one single point. That point has a special name. It is called the vertex.
Think of it this way. Take two sticks. Place them so they touch at one end. The space between them is the angle. The touching end is the vertex. The sticks themselves are the sides. That is the basic structure.
Why does this matter? Because angles are everywhere. They are in the corners of your room. They are in the way you hold a pencil. They are in the way a bridge supports weight. Without understanding the vertex and the sides, you cannot measure or use these shapes effectively.
The definition is simple. Two semicircles. One common origin. That creates a region on a plane. This region is the angle. Nothing more. Nothing less. But get this foundation wrong, and everything else in geometry becomes confusing. Start with the vertex. Then look at the sides. Then see the space between them. That is how you begin.
Geometry breaks down angles into specific categories based on their measurement. You determine these measurements by looking at the rotation of one side relative to another, typically using a protractor to get the degrees.
Measuring the Rotation
Before diving into the specific types, it helps to understand the tool. A protractor allows you to measure the opening between two lines. This opening is the core of what an angle is.
Acute Angles Explained
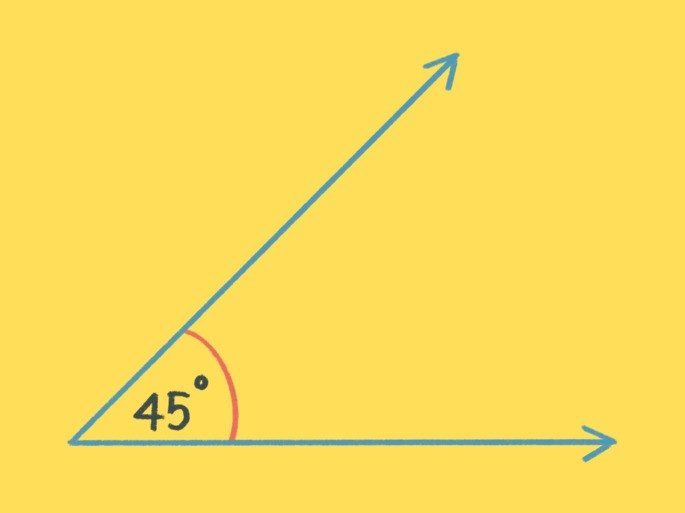
An acute angle is any angle that measures less than 90 degrees but more than 0 degrees.
Think of a slice of pizza. The tip of the slice, where the crust meets the other side, is often an acute angle. It is sharp. It is narrow.
Here is how you identify one:
- Look at the vertex (the corner point).
- If the opening is smaller than a right angle (which is 90 degrees), it is acute.
- Common examples include 30 degrees, 45 degrees, or 89 degrees.
Why does this matter for students?
Recognizing acute angles helps in solving basic geometric problems. It is the first step in understanding how shapes fit together.
Comparison with Other Angles
To truly grasp the concept of an acute angle, you need to see how it differs from others.
A right angle is exactly 90 degrees. It forms a perfect L-shape.
An obtuse angle is larger than 90 degrees but less than 180 degrees.
A straight angle is exactly 180 degrees, forming a straight line.
An acute angle is smaller than all of these.
Practical Application
Where do you see acute angles in real life?
- The corner of a book when it is slightly open.
- The hands of a clock at 1:00 or 2:00.
- The pitch of a roof on a house.
Students often confuse acute and obtuse angles. The key is the 90-degree benchmark. If it looks sharper than a right angle, it is acute. If it looks wider, it is obtuse.
Using a Protractor Correctly
To measure an acute angle accurately:
- Place the center of the protractor on the vertex of the angle.
- Align the baseline of the protractor with one side of the angle.
- Read the degree where the other side crosses the protractor scale.
This process works for any angle, but acute angles will always show a number less than 90.
Why Geometry Matters
Understanding angle types is not just about passing a test. It is about seeing the world in terms of structure and measurement. Architects use this knowledge to design buildings. Engineers use it to build bridges.
Even for lifelong learners, grasping these basics opens the door to more complex topics like trigonometry.
You start with the basics.
An acute angle is simple. It is small. It is sharp.
But it is the foundation for understanding how lines interact in space.
The Right Angle: The 90-Degree Benchmark
An acute angle sits comfortably between zero and ninety degrees. It never touches that ninety-degree mark. Think of a soft-serve ice cream cone. The sides slope inward. They form a sharp point. Or look at an isosceles triangle. The top vertex often holds an acute angle. But once that slope hits vertical, things change.
What Defines a Right Angle?
A right angle is exactly ninety degrees. It is the gold standard for perpendicularity. When two lines meet at this precise angle, they create a perfect corner. This is not just a geometric curiosity. It is the foundation of grid systems. Every time you look at a wall meeting a floor. Or the corner of a piece of paper. You are seeing a right angle in action.
Why 90 Degrees Matters in Learning
Students often struggle with abstract definitions. Concrete examples help. A book standing upright on a table forms a right angle with the surface. A square tile has four right angles. Understanding this specific measure helps in construction. It is key for accurate measuring. And it simplifies trigonometry later on.
How to Identify a Right Angle
You do not always need a protractor. Look for these signs:
- Square corners: Most doors and windows are designed with right angles.
- Perpendicular lines: If lines intersect and look evenly spaced in all four quadrants, they likely form right angles.
- Combinations: Two acute angles can sum to ninety degrees. Together they make a right angle.
Common Misconceptions
People often confuse right angles with straight lines. A straight angle is one hundred eighty degrees. It forms a line. A right angle is a quarter of a circle. It creates an L-shape. Confusing these leads to errors in drawing and measurement.
Visualizing the Difference
Imagine a clock. The hands at 3:00 form a right angle. The hands at 6:00 form a straight angle. The hands at 1:00 form an acute angle. This mental model makes it easier to spot these angles in daily life.
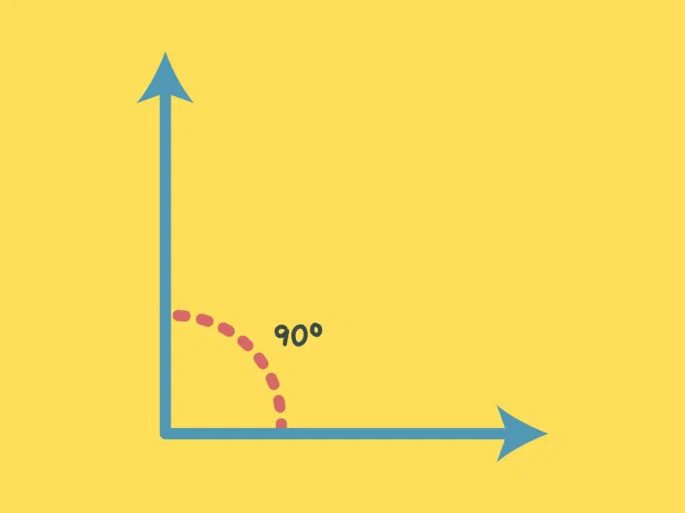
Defining the Right Angle
A right angle is exactly ninety degrees. The sides meet at a vertex and are perpendicular to each other. You see this shape everywhere in basic geometry. The corners of a square are the most obvious examples. Each corner forms a perfect right angle. Triangles also use this concept. A right-angled triangle has one corner that measures 90° while the other two share the remaining 90°.
The Obtuse Angle
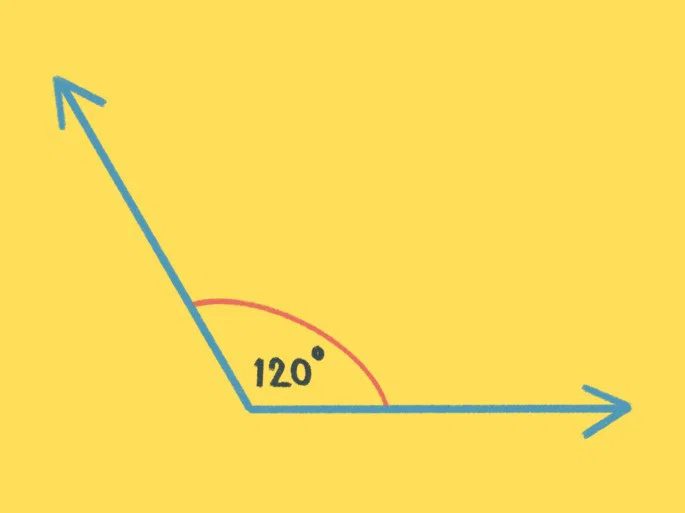
An obtuse angle is larger than a right angle but smaller than a straight line. It measures anywhere between 90° and 180°. Think of a clock. When the hour hand is at 10 and the minute hand is at 2, you have an obtuse angle. It is wide. It is open. It is not sharp like an acute angle, nor is it a flat line like a straight angle.
How to Identify Each Type
You don’t need a protractor every time. Visual cues work well.
- Right angles look like the corner of a page or a book. They are square.
- Obtuse angles look like a wide mouth. They are broader than a right angle.
If you are building something, these measurements matter. A carpenter uses right angles to ensure a shelf is level. A designer might use obtuse angles to create dynamic shapes in a layout.
Why the Distinction Matters
Knowing the difference helps in more than just math class. Architects need precise angles for structural integrity. Even simple tasks like hanging pictures require a right angle to look correct. If you are learning geometry, start with these two. They are the bridge between simple shapes and complex figures.
Where do you encounter these angles in your daily life? A doorway. A table. The hands of a clock. They are always there. Waiting to be measured.
Llegamos a la frontera. El siguiente paso en tu viaje por la geometría básica no es un ángulo “abierta” o “cerrada”, sino algo que parece una línea recta, pero que en realidad es una medida específica. Hablamos del ángulo llano.
Este tipo de ángulo tiene exactamente 180 grados. No más. No menos.
¿Qué es un ángulo llano y cómo se forma?
Imagina una línea recta. Ahora imagina un punto en el medio de esa línea. Si dibujas un arco desde un lado del punto hasta el otro, cubriendo los 180 grados, has creado un ángulo llano.
“Un ángulo llano es la mitad de una vuelta completa.”
Es la extensión máxima que puede tener un ángulo antes de convertirse en un ángulo completo (360°) o comenzar a “doblarse” hacia atrás (ángulos reflexivos).
Diferencia entre ángulo llano y otros tipos
La confusión aquí es común. Los estudiantes suelen mezclar conceptos. Para aclararlo, comparemos:
- Ángulo recto (90°): Forma una “L”. Es un cuarto de círculo.
- Ángulo obtuso (>90° y <180°): Es más abierto que un recto, pero aún no es una línea.
- Ángulo llano (180°): Es una línea recta. No hay “abertura” en el sentido tradicional; los dos rayos apuntan en direcciones opuestas desde el mismo vértice.
Ejemplos cotidianos de ángulo llano
No necesitas un compás para encontrarlos. El ángulo llano está en todas partes:
- Un libro abierto completamente: Si abres un libro hasta que las tapas formen una línea plana sobre la mesa, las páginas crean un ángulo llano.
- Una regla o una línea de meta: Cualquier objeto recto trazado sobre papel representa la base de un ángulo llano.
- Las manecillas de un reloj: A las 6:00 en punto, las manecillas forman una línea vertical perfecta. Eso es un ángulo llano.
- Caminar en línea recta: Si das un paso, te detienes, y das otro paso exactamente en la misma dirección, tu cuerpo ha recorrido un ángulo llano entre esos dos puntos.
¿Por qué importa el ángulo llano en geometría?
Entriando en temas más avanzados, este concepto es la base para entender:
- Ángulos suplementarios: Dos ángulos son suplementarios si suman 180°. Un ángulo llano es la suma de dos ángulos rectos, o de uno agudo y uno obtuso, siempre que su total sea 180°.
- Líneas paralelas y transversales: Cuando una línea corta a dos paralelas, los ángulos consecutivos internos suman 180°. Esto es una aplicación directa de la propiedad del ángulo llano.
Cómo calcular o identificar un ángulo
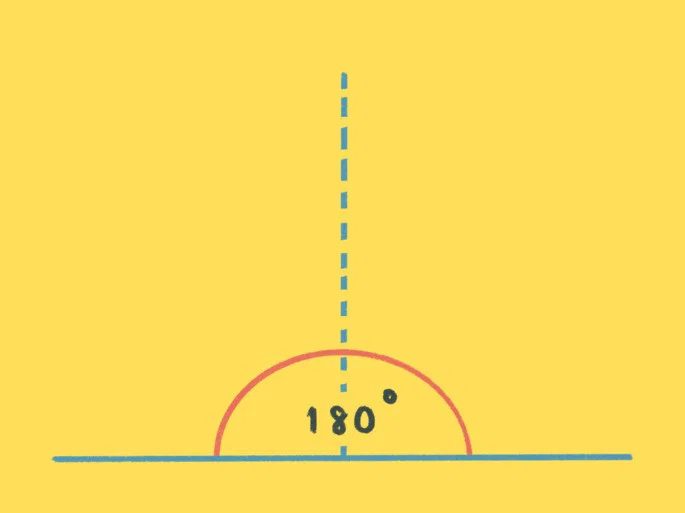
A straight angle is defined by its precise measurement of 180 degrees. It is unique because the two lines forming it extend from a single vertex to create a perfect straight line. Think of it as a line that has been bent exactly in half.
Real-world examples make this abstract concept tangible. Consider a clock face. When the hands are positioned such that the hour hand points to 3 and the minute hand points to 9, the angle formed is straight. Similarly, at 12:30, the hands create this linear formation. These moments in time serve as practical demonstrations of geometric principles in everyday life.
How to Identify a Reflex Angle
While a straight angle occupies exactly half a circle, a reflex angle takes up more than that. It is defined as an angle greater than 180 degrees but less than 360 degrees. If you imagine a clock again, think about the space between the hands when they form a large, open shape rather than a sharp one.
For instance, if the hour hand is at 6 and the minute hand is at 2, the smaller angle is acute, but the larger, outer angle is reflex. It covers the majority of the clock face. Understanding the distinction between acute, obtuse, right, and reflex angles helps in visualizing spatial relationships. It is not just about memorizing numbers; it is about seeing how lines interact in space.
Why This Matters in Practical Applications
Knowing these distinctions is not just for geometry class. Engineers, architects, and designers rely on these measurements daily. A straight line suggests stability and direction. A reflex angle, often seen in complex structures or curved pathways, indicates a turn or a continuation of a path beyond a simple bend.
When you encounter a reflex angle in a diagram, remember to look at the larger portion of the circle. The calculation is straightforward: subtract the inner angle from 360 degrees. This simple arithmetic reveals the true measure of the reflex angle.
Visualizing the Difference
To clarify, a straight angle is exactly 180 degrees. A reflex angle starts just above 180 degrees and goes up to, but not including, 360 degrees. The boundary between them is the straight line. Crossing that threshold changes the nature of the angle entirely. It shifts from a flat line to an opening that encompasses more than half a circle.
This distinction is crucial for accurate measurements in fields ranging from navigation to construction. Misinterpreting a reflex angle as a straight or obtuse one can lead to significant errors in design and planning. Therefore, recognizing the visual cues and the numerical boundaries is essential.
Applying the Concept
If you are studying geometry, practice identifying these angles in various shapes. Look at the corners of a room. Most are right angles, but think about the space around a central pillar. The angles formed by the walls meeting the pillar might be reflex depending on how you measure them.
Consider the hands of a clock again. At 6:00, the angle is straight. At 6:30, it becomes acute. But at 5:00, the angle between 5 and 12 is reflex. It spans five hours, which is more than half the clock. This method of using the clock as a reference tool can help you quickly estimate angle sizes
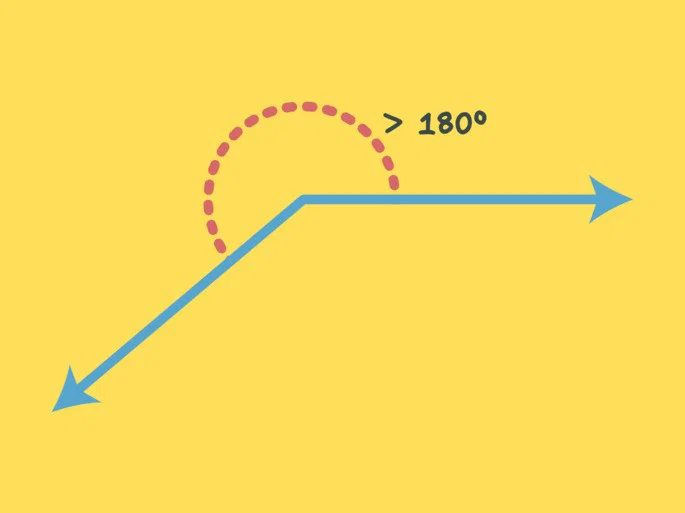
The reflex angle explained
Most people stop at 180 degrees. They know a straight line. They know a corner. But geometry doesn’t stop there. Enter the reflex angle.
It is an angle that measures more than 180°, but less than 360°.
Think of it this way. Take a round pizza. Cut it from the center outward. If you eat slightly less than half of it, the slice you still have left isn’t just a standard slice. It is a reflex angle.
The space you are looking at wraps around the center. It is bigger than a straight line. Smaller than a full circle.
This is what we call a concave angle.
It is not a trick question. It is just geometry with a larger scope.
What makes an angle complete?
Now look at the full circle.
That is the complete angle.
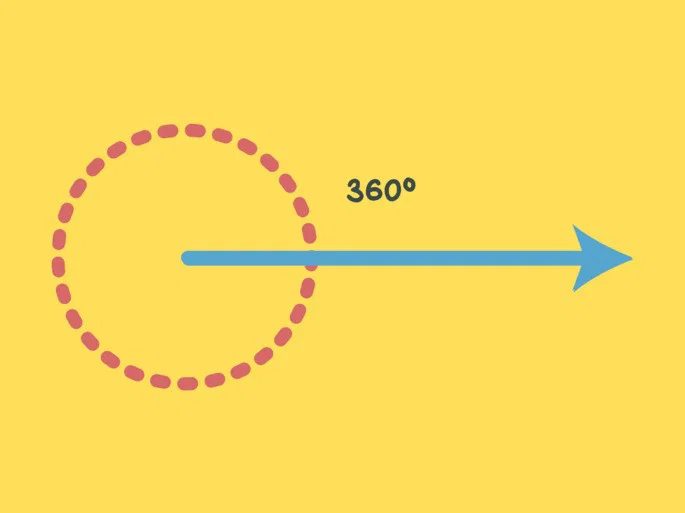
It measures exactly 360°.
It is the full rotation. One full turn.
If you start at 12 o’clock on a clock and spin all the way around back to 12 o’clock, you have completed a complete angle.
It is the sum of all other angles.
A right angle is 90°. Four of them make 360°.
A straight angle is 180°. Two of them make 360°.
A reflex angle plus its smaller counterpart equals 360°.
Why does this matter for students?
Students often get stuck on acute and obtuse angles. They forget the bigger picture.
Why do we need to know about reflex angles?
- Navigation: Pilots and sailors don’t just turn left or right. They sometimes turn the long way around.
- Design: Graphic designers use full rotations to create circular menus or spinning logos.
- Engineering: Gears and wheels complete full circles. Understanding the full 360° rotation is key.
Without knowing the full circle, you can’t measure the remainder.
How to visualize the difference
Picture a clock again.
- Acute: 1:00 to 2:00. Small slice. Less than 90°.
- Right: 12:00 to 3:00. Quarter of the clock. 90°.
- Obtuse: 12:00 to 5:00. More than 90°, less than 180°.
- Straight: 12:00 to 6:00. Half the clock. 180°.
- Reflex: 12:00 to 6:00, but going the other way. More than 180°.
- Complete: 12:00 back to 12:00. 360°.
The reflex angle is the “hidden” part.
It is what remains when you subtract a smaller angle from a full circle.
360° minus 120° equals 240°.
That 240° is a reflex angle.
Practical steps for learners
If you are teaching this to kids or reviewing it yourself, try these steps.
- Use a protractor. Draw
When a Circle Becomes a Full Turn
Picture a line that spins all the way around. It covers 360°. The start point meets the end point. You could drive around the earth and stop exactly where you began. Math calls this a full rotation. It is also known as a perigon or a complete angle. It is the ultimate return to zero.
How Angles Sit Next to Each Other
Not all angles are isolated. Some share space. Some share vertices. The way they connect changes how we measure them.
Adjacent angles share a common vertex and one side. The other sides form a straight line. They are opposite rays. Add their measures together. You get 180°. They are partners in a straight path.
Opposite angles sit across from each other at a vertex. Their sides are opposite rays. They mirror each other’s geometry. Think of an ‘X’. The angles facing each other are linked by that intersection.
Consecutive angles sit side by side. They share a vertex and a side. One is just next to the other. They don’t necessarily form a straight line. They just occupy adjacent space.
The Math of Addition
Grouping angles by their total size reveals two useful categories.
Supplementary angles add up to 180°. If you have a 120° angle, its supplement is 60°. Together they make a straight line.
Complementary angles add up to 90°. A 30° angle needs a 60° partner. They create a right angle.
Understanding these relationships is key to mastering geometry basics.
Why This Matters for Learning
You might think these are just abstract rules. They are not. They describe real spatial relationships. When you build something. When you navigate. When you design. These concepts apply.
Students often struggle with the difference between adjacent and consecutive. The distinction is subtle but important. Adjacent angles must have opposite rays for the other sides if they are to sum to 180°. Consecutive angles just need to share a side and vertex. They don’t have to form a straight line.
Complementary and supplementary angles are about totals. Keep the target numbers in mind. 90°. 180°. If the sum hits one of those, you have your answer.
Practical Application
Consider a clock. The hands form angles. At 6:00, they form a straight angle. 180°. That is supplementary. At 3:00, they form a right angle. 90°. That is complementary. The clock face is a practical guide.
Parents helping with homework can use these analogies. A straight line is 180°. A corner is 90°. Break complex problems into these familiar shapes.
Lifelong learners should see this as mental flexibility. Geometry is not just about shapes. It is about relationships. How parts relate to the whole. How sums create structures.
Moving Forward
The study of angles is foundational. It leads to trigonometry. It leads to architecture. It leads to navigation. Mastering these basic types builds a strong base.
Don’t get bogged down in memorizing every term. Understand the logic. Why do adjacent angles sum to 180°? Because they form